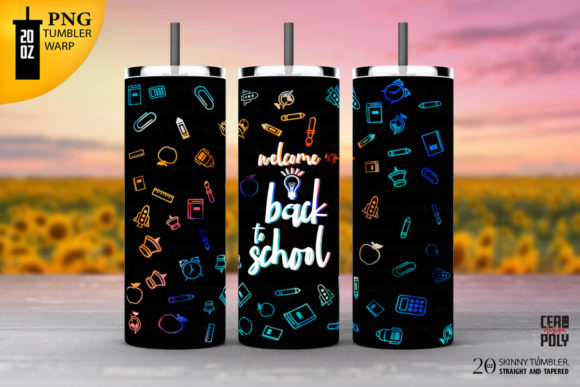
Back to School Tumbler 20 Oz Sublimation: A Smart Design Resource
If you create or sell custom drinkware, you already know that the design file you start with can make or break your final product. The Back to School Tumbler 20 Oz Sublimation design is a targeted resource for anyone producing personalized tumblers for the back-to-school season. It provides two distinct shapes — straight and tapered — so you can match your physical blank exactly. Whether you are a small business owner looking to expand your product line or a hobbyist crafting gifts for teachers and students, this set offers a practical foundation for high-quality sublimation projects.
Let’s walk through what this download actually includes, why the shapes matter, and how you can put these files to work in your everyday projects. We will also cover a few real-world considerations that will save you time, material, and frustration.
What Is the Back to School Tumbler 20 Oz Sublimation Set?
This digital download is designed specifically for sublimating onto 20 oz tumblers. The set includes two PNG files and two JPG files — one for a straight-wall tumbler and one for a tapered (skinny) tumbler. Each file is sized at 9.3 inches by 8.2 inches with a resolution of 300 dpi. The PNG files also feature a transparent background, which makes layering or combining elements much easier if you plan to edit the design further.
The key distinction between straight and tapered is simple but important. A straight-wall tumbler has consistent diameter from top to bottom, so the design wraps evenly. A tapered or skinny tumbler narrows toward the base, meaning the design must account for that curve to avoid distortion. By providing both shapes, this set eliminates the guesswork. You select the file that matches your blank, print it, press it, and move on.
Why the Two Shape Options Matter for Sublimation
When I first started sublimating, I assumed one design template would cover all tumblers. That assumption led to misaligned prints, wasted paper, and a lot of frustration. The reality is that the taper of a tumbler changes how the image wraps around the surface. Using a straight-wall template on a tapered tumbler will cause the image to warp or leave gaps near the top or bottom. The Back to School Tumbler 20 Oz Sublimation set addresses this by giving you a dedicated template for each shape.
- Straight wall: Ideal for classic tumblers that have the same diameter throughout. The design prints evenly, and placement is straightforward.
- Tapered or skinny: Designed for slim tumblers that narrow at the bottom. The template compensates for the curve, so the artwork sits naturally on the surface.
Having both options in one download means you are prepared whether your customer orders a standard tumbler or the more popular skinny version.
Practical Applications Across Different Environments
This design tool is not just for large production runs. It works equally well in small studios, classroom settings, and even personal gifting projects. Let’s look at a few realistic scenarios.
For Small Business Owners and Entrepreneurs
If you run a sublimation business, efficiency is everything. The Back to School Tumbler 20 Oz Sublimation set saves you the time of manually adjusting templates for different tumbler shapes. You can offer both straight and skinny tumblers in your product lineup without having to redraw your artwork. This is especially useful during the back-to-school rush when teachers, parents, and students are ordering personalized drinkware.
You can also use the transparent PNG files to layer custom text, monograms, or school logos on top of the background design. Because the PNG keeps transparency intact, you can drop in a student’s name or a school mascot without wrestling with white boxes or awkward edges.
For Hobbyists and Crafters
Maybe you are making a few tumblers as gifts for your child’s teachers or for your own kids. You do not need to spend hours measuring and formatting. Simply pick the straight or tapered file based on your tumbler blank, load it into your design software, add your personal touches, and print. The 300 dpi resolution ensures that the print will be crisp and clean, even for detailed elements like small text or intricate patterns.
For Digital Product Sellers and Content Creators
If you sell digital products on a marketplace like Etsy or Creative Market, this set can serve as a base for creating your own back-to-school collections. You can build variations around it — different color schemes, themes, or add-on elements — and offer them as a bundled package. The two-shape format is a selling point in itself because buyers appreciate the flexibility.
Key Characteristics and Strengths of This Design Set
Let’s break down what makes this download a practical choice for sublimation work.
High Resolution and Correct Print Size
At 9.3 inches by 8.2 inches and 300 dpi, these files are ready to print at full size for a 20 oz tumbler. You do not need to scale up or interpolate, which would degrade quality. The resolution is standard for commercial sublimation, so your final product will have sharp edges and vibrant colors.
Transparent Background in PNG Files
The PNG files include a transparent background. This is valuable because it allows you to overlay the design onto different backgrounds, combine it with other graphics, or place it directly onto a sublimation layout without fighting white fills. If you use software like Photoshop, Affinity Designer, or even Canva (with layers enabled), the transparency gives you more creative control.
Two File Formats for Compatibility
PNG and JPG are widely supported across all design programs. You do not need specialized software to open or edit these files. The JPG version works well if you are printing directly without need for transparency. The PNG version gives you flexibility when layering. Having both formats ensures you are covered whether you are a beginner using free software or a professional working in a paid tool.
Straight and Tapered Shapes Included Together
Many design packs offer only one shape. This set gives you both. That is a time-saver and a cost-saver. Instead of buying two separate templates, you get them in one download. For a small business, that means you can immediately offer both tumbler styles to your customers without additional design work.
Benefits Related to Usability, Efficiency, and Branding
Beyond the technical specs, this design set offers practical benefits that affect your day-to-day workflow and your final product quality.
- Reduced setup time: You skip the trial-and-error of fitting a design to an unfamiliar tumbler shape. The template is pre-sized and shaped for the blank you are using.
- Consistent output: Because the design is formatted to industry-standard dimensions, your prints will look uniform across multiple tumblers. That consistency matters for branding and customer satisfaction.
- Easier scaling: If you want to create a full back-to-school product line, this design gives you a foundation. You can change colors, add text, or swap out graphics while keeping the same template structure.
- Improved communication with clients: If you take custom orders, you can show a mockup using the PNG file. Clients can see exactly where their text will sit and how the design wraps around the tumbler.
Practical Considerations When Using This Design Set
Even with a well-made template, a few practical points can make the difference between a successful print and a wasted blank.
Check Your Tumbler Dimensions Before Printing
While the file is sized for a standard 20 oz tumbler, not all blanks are identical. Some manufacturers make slight variations in height or diameter. I recommend measuring your actual tumbler circumference and height, then comparing that to the template. If your blank deviates more than a few millimeters, adjust the print size accordingly. The 300 dpi resolution gives you some flexibility to scale within reason without losing sharpness.
Use Proper Tape and Paper for Sublimation
The design files are only as good as your transfer process. Make sure you use sublimation paper rated for your printer type and heat tape that can withstand the pressing temperature. Even a perfectly formatted PNG will produce a blurry result if the paper shifts during pressing.
Test on Scrap Material First
Before committing a final tumbler blank, do a test print on a piece of sublimation scrap or a low-cost coaster. This confirms that your colors are correct, the size is right, and the image aligns with your blank’s shape. It also lets you verify that the straight or tapered template actually matches your tumbler model.
Organize Your Files by Shape
Since the download includes both straight and tapered files in PNG and JPG, I recommend renaming them clearly or sorting them into folders. When you are working quickly — especially during a busy season like back-to-school — it is easy to grab the wrong file. A simple file naming convention like “20oz_Tapered_PNG” or “20oz_Straight_JPG” prevents mistakes.
Realistic Use Cases and Observations
Let me share a few observations from using similar design sets in real production.
One common mistake I see is people using a straight-wall template on a tapered skinny tumbler. They assume the taper is minimal enough that it will not matter. In practice, even a slight taper can cause the design to look squeezed at the bottom or stretched at the top. The result looks amateurish and often peels or bubbles at the seams. The Back to School Tumbler 20 Oz Sublimation set eliminates this issue by providing the correct template for each shape.
Another observation: many sublimation designers undervalue the importance of a transparent PNG. If you sell on a platform that allows customers to preview designs with their own text, the PNG file lets you create mockups quickly. You do not need to cut out the background or deal with white edges. That transparency makes your product visuals look professional and clean.
Finally, I have found that offering both straight and tapered options increases average order value. Customers who want a straight tumbler for themselves might add a tapered one as a gift. If you only offer one shape, you miss half that opportunity. Having this design set in your inventory means you can say yes to both requests immediately.
Final Recommendations for Getting the Most Out of This Download
To wrap things up, here are a few actionable steps you can take right now to make this design set work for you.
- Verify your tumbler blank type. If you are unsure whether your blank is straight or tapered, measure the top and bottom diameters. If they are the same, it is straight. If the bottom is noticeably narrower, use the tapered file.
- Open the PNG file in your editing software first. The transparent background gives you the most flexibility. Add your text, logos, or patterns while keeping the base design intact.
- Save a master copy of each shape. After you customize the design for your needs, save a version with your usual branding elements. That way, you can reuse it for future orders without starting from scratch.
- Print a test sheet. Use the JPG version for a quick test if you do not need layering. The JPG is slightly smaller in file size and loads faster in some software.
- Keep the 300 dpi in mind when resizing. If you need to scale the design down for a smaller blank, you can. But scaling up beyond the original dimensions will reduce clarity. For a 20 oz tumbler, the provided size is ideal.
The Back to School Tumbler 20 Oz Sublimation design set is a practical, ready-to-use resource that respects your time and your materials. Whether you are a seasoned pro or just starting out, having both straight and tapered templates with high-resolution PNG and JPG files gives you a solid foundation for creating personalized drinkware that people actually want to use and carry. Focus on the fit, take advantage of the transparency, and you will produce tumblers that look polished and professional from the first press.